6 KiB
How to setup CodiMD SAML with Keycloak
Configuring Keycloak
Get the public certificate
- Select the Realm you want to use for your CodiMD SAML
- Select "Realm Settings" in left sidebar
- Select the "Keys" tab
- Click the button "Certificate" at
RS256algorithm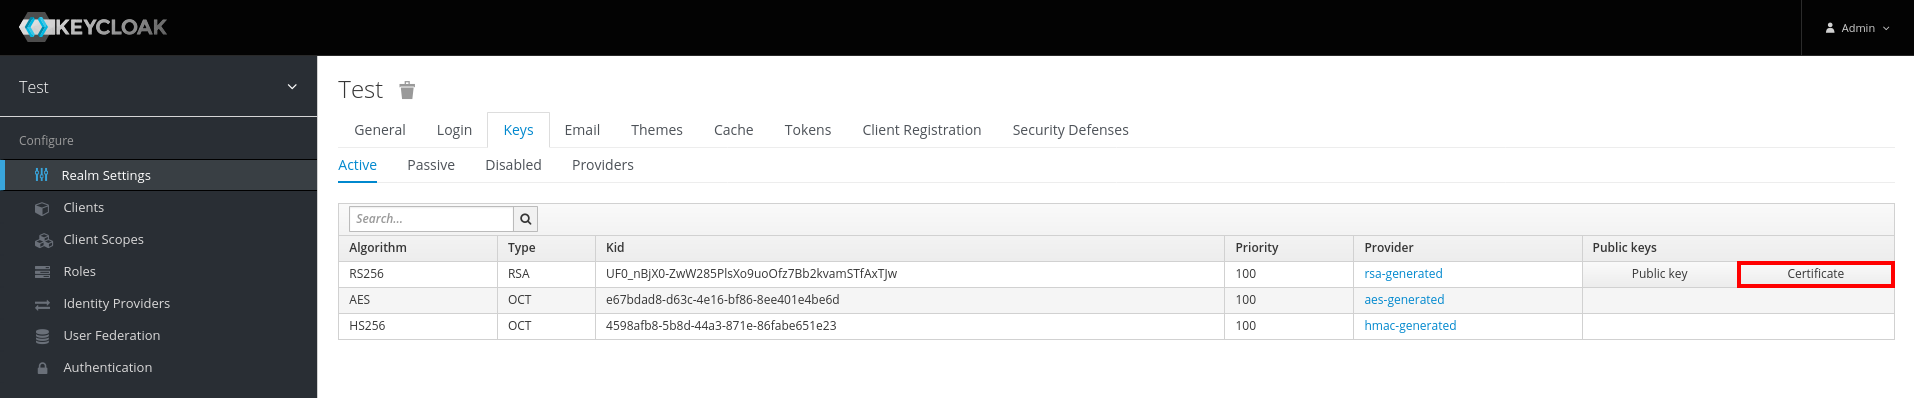
- Copy this key and save it to the file specified in
saml.idpCertproperty of the CodiMD configuration orCMD_SAML_IDPCERTenvironment variable
Create a new client
- Select "Client" in left sidebar
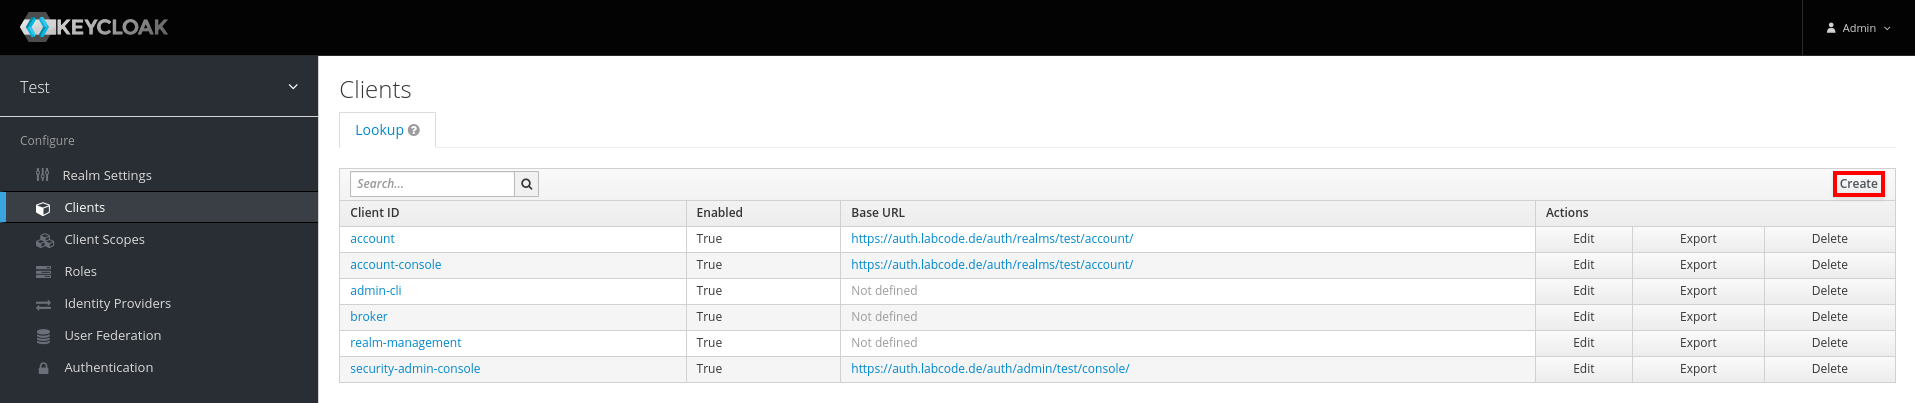
- Click on the "Create" button
- Set a Client ID and specify this in
saml.issuerproperty of the CodiMD configuration orCMD_SAML_ISSUERenvironment variable - Select
SAMLas Client Protocol - Set Client SAML Endpoint to
https://codimd.example.com/auth/saml(replacehttps://codimd.example.comwith the base URL of your CodiMD installation)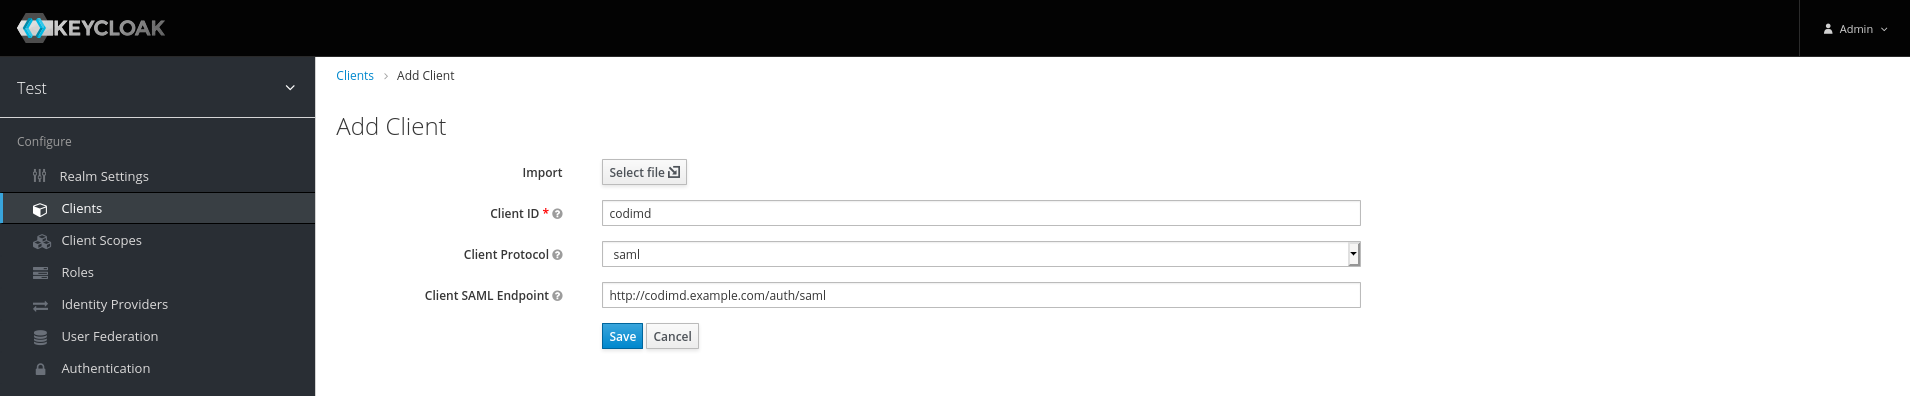
- Leave "Client Signature Required" enabled
- Set Root URL to
https://codimd.example.com(replace it here also with the base URL of your CodiMD installation) - Set Valid Redirect URIs to
https://codimd.example.com/auth/saml/callback(you should also define all other domains of your CodiMD installtion with the suffix/auth/saml/callback) - Set Base URL to
/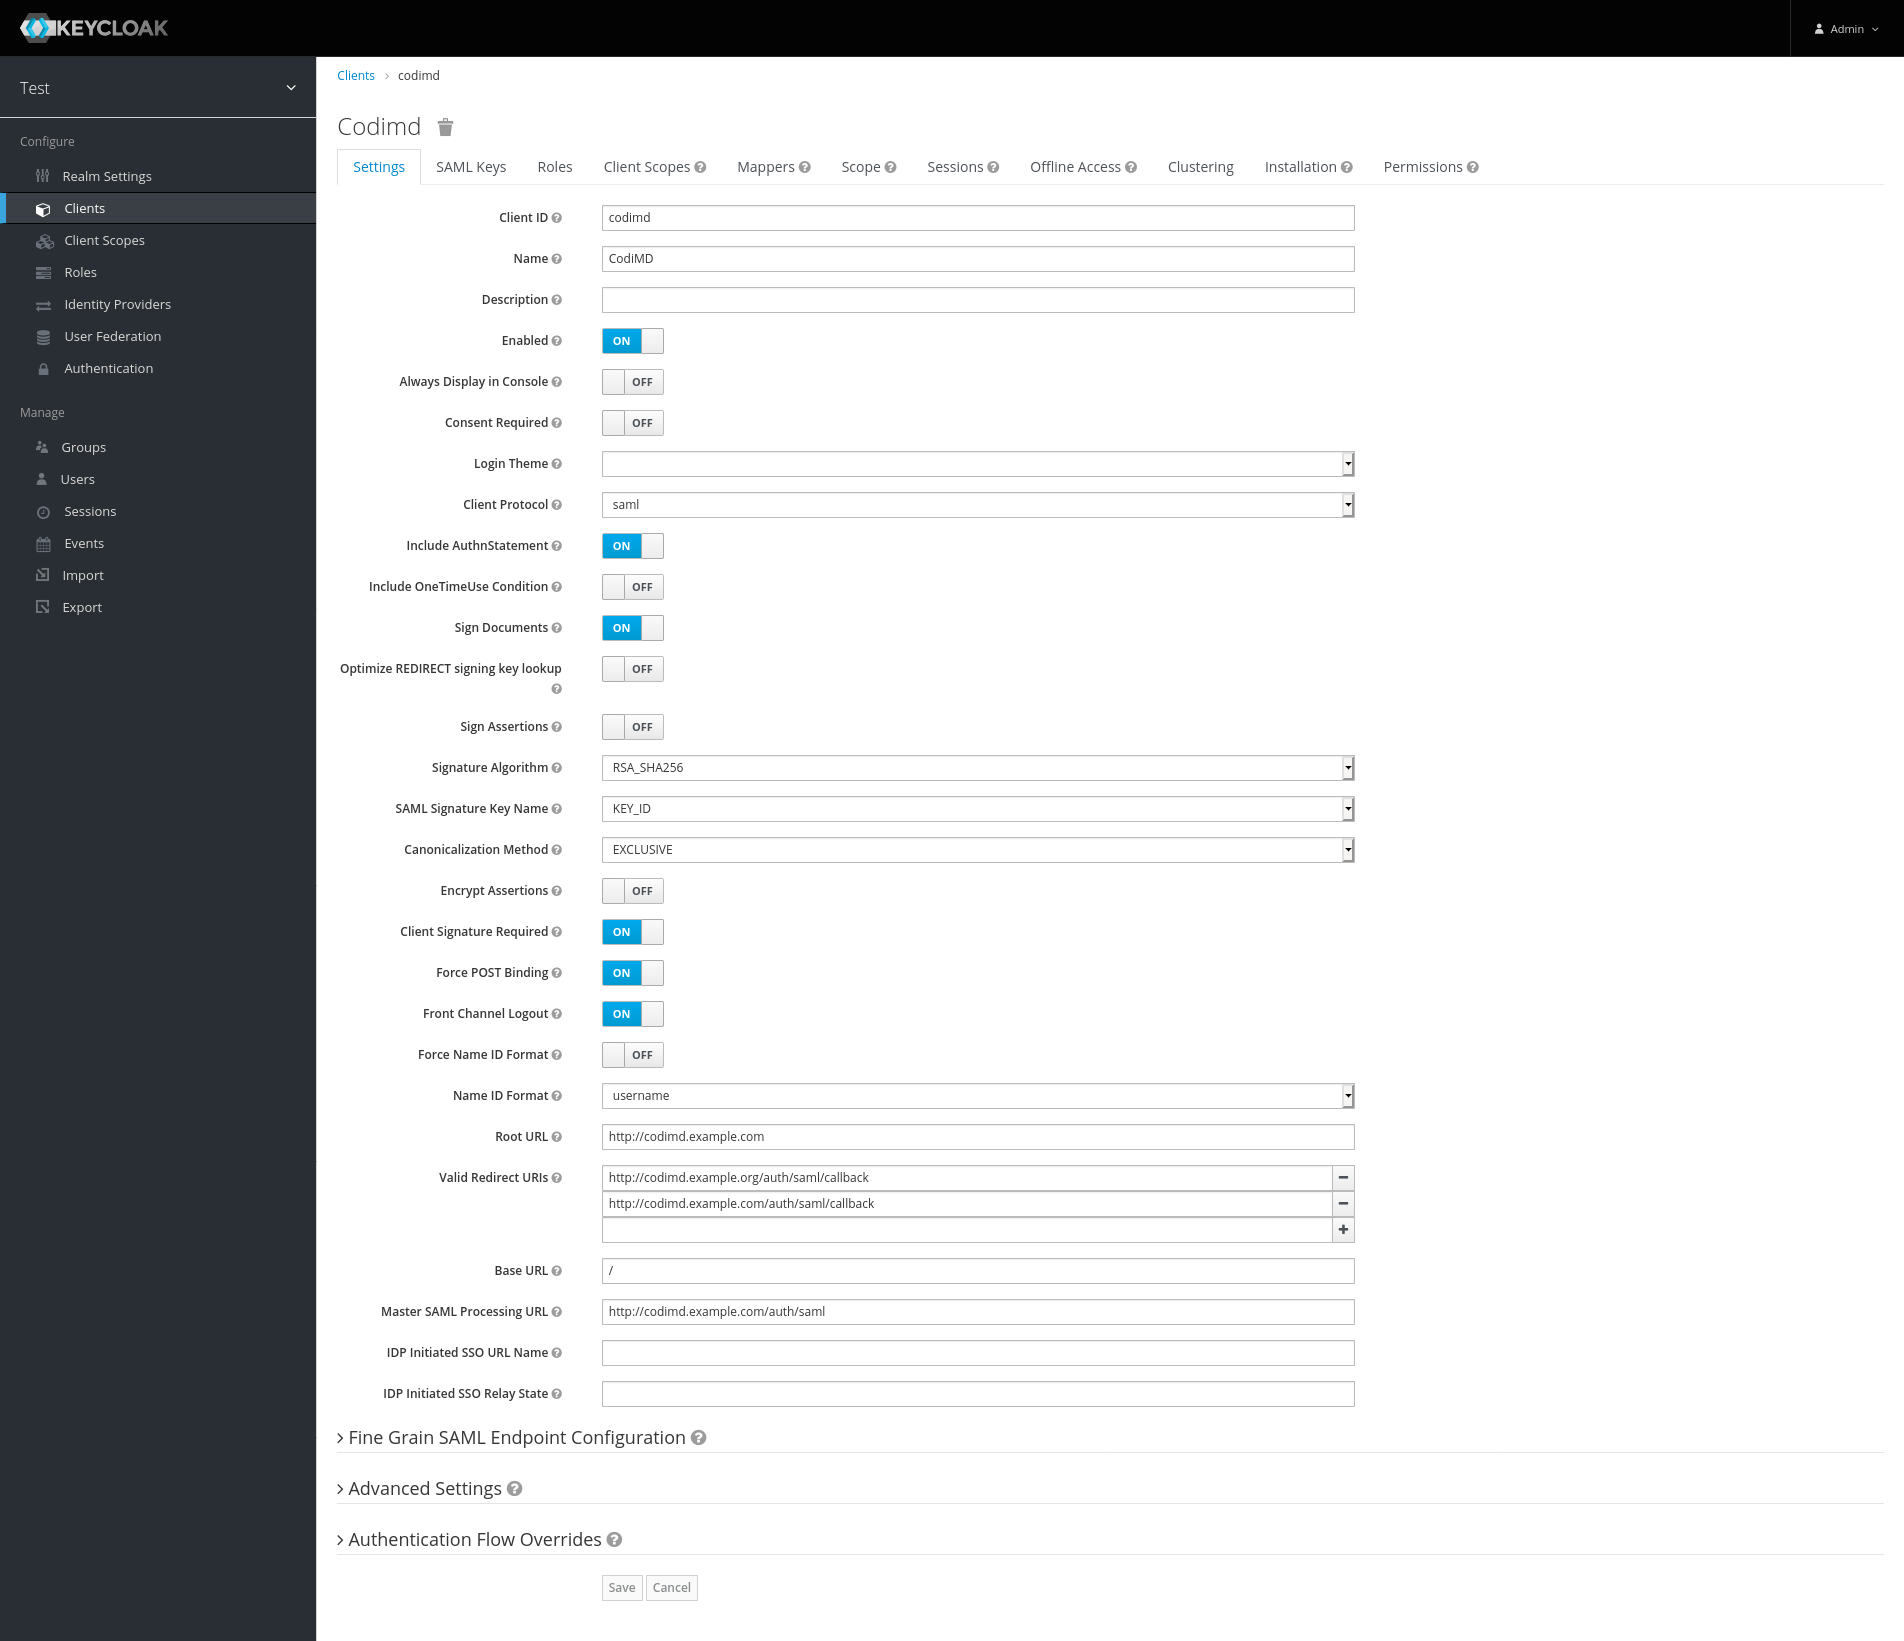
- (optional) You can set which Name ID Format should be used
Configure CodiMD
Config file
You have to put the following block inside your config.json:
"saml": {
  "issuer": "codimd", // Change to the "Client ID" specified in the Keycloak Client
  "identifierFormat": "urn:oasis:names:tc:SAML:1.1:nameid-format:unspecified",
  "idpSsoUrl": "https://keycloak.example.org/auth/realms/test/protocol/saml", // replace keycloak.example.org with the url of your keycloak server
  "idpCert": "/path/to/the/cert.pem",
  "clientCert": "/path/to/the/key.pem" // this one is optional, see below
}
Environment Variables
CMD_SAML_IDPSSOURL:https://keycloak.example.org/auth/realms/test/protocol/saml(replace keycloak.example.org with the url of your keycloak server)CMD_SAML_IDPCERT:/path/to/the/cert.pem- (optional, see below)
CMD_SAML_CLIENTCERT:/path/to/the/key.pem CMD_SAML_ISSUER:codimd(Change to the "Client ID" specified in the Keycloak Client)CMD_SAML_IDENTIFIERFORMAT:urn:oasis:names:tc:SAML:1.1:nameid-format:unspecified
Client certificate (optional)
If you want keycloak to be able to verify CodiMD, you hava to create a client certificate. There are two options for this:
Create Private Keys for Signing
- Generate the private key and certificate with the following commands:
openssl genrsa -out priv.pem 2048
openssl req -new -x509 -key priv.pem -out cert.pem
execute the following steps in keycloak
- Select "Client" in left sidebar
- Go to your CodiMD-Client
- Select the "SAML Keys" tab

- Click on "Import"
- Select
Certificate PEMas "Archive Format" - Now upload the generated cert.pem (in this case named
cert.pem)
- Click on "Import"
- Move or copy this key (in this case named
key.pem) and save it to the file specified insaml.clientCertproperty of the CodiMD configuration or in the enviroment-variableCMD_SAML_CLIENTCERT
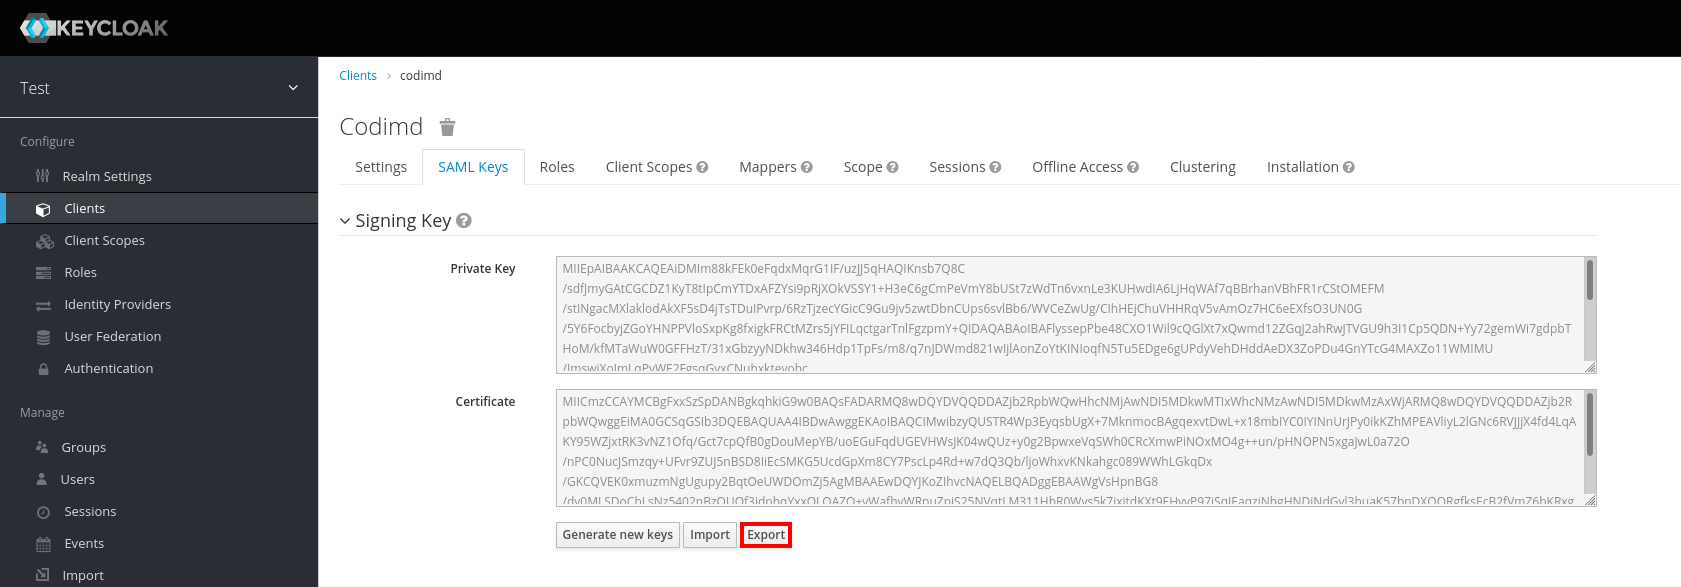
Convert Private Certificate generated by KeyCloak
Instead if generating you own certificate, you can also use the one generated by keycloak.
-
Select "Client" in left sidebar
-
Go to your CodiMD-Client
-
Select the "SAML Keys" tab
-
Now click on "Export"
-
Here you can select the output format, choose
PKCS12. You also have to set a password. Choose your own.
-
Click on "Download" and save the file somewhere on you computer
-
You now have to extract the private Key. You can do this with the following command. WHen asked, enter your password.
openssl pkcs12 -in keystore.p12 -out key.pem -nocerts -nodes
- Move or copy this key (in this case named
key.pem) and save it to the file specified insaml.idpCertproperty of the CodiMD configuration or in the enviroment-variableCMD_SAML_CLIENTCERT
Use Persistent Identifiers
Instead of using the username as the owner-key in the CodiMD database, you can also use a persistent identifier. This allows to change the username, without them loosing access to their notes.
- Go to the CodiMD-Client in keycloak. Now enable the option "Force Name ID Format" and select "persistent" as the "Name ID Format".

- For codimd to be able to use the username and email configured in keycloak, you have to create the following SAML protocol mappers:
2.1. Create a mapper with the type
User Property. Set the Name, Property and SAML Attribute Name tousername. Now you can specify a friendly name (for exampleUsername)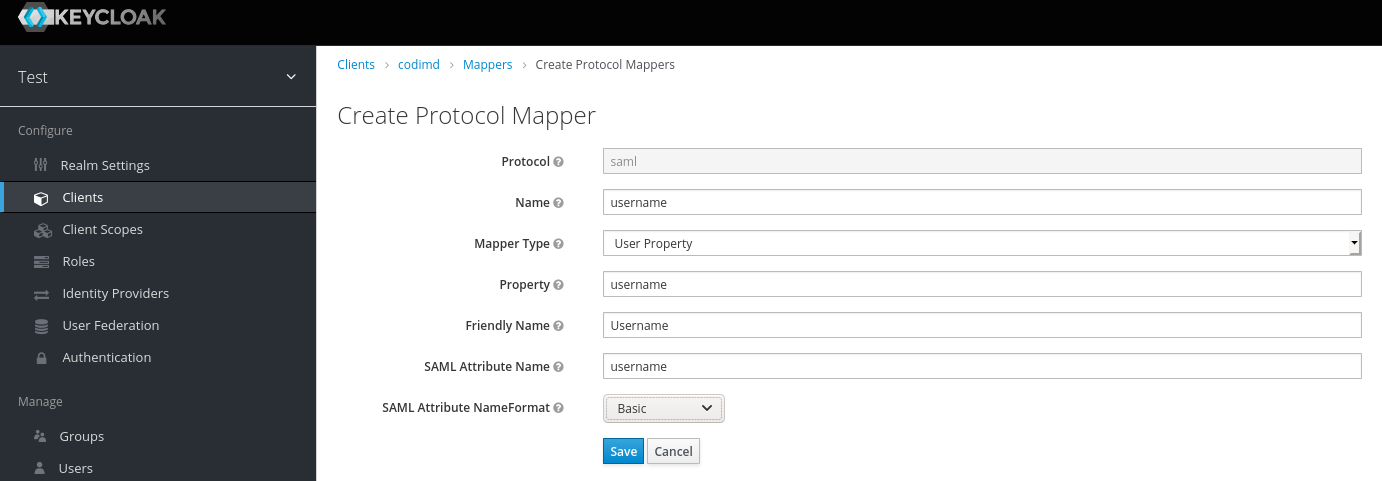 2.2 Create a mapper with the type
 User Property. Set the Name, Property and SAML Attribute Name toemail. Now you can specify a friendly name (for exampleE-Mail)
The configured mappers should look like this:

- You now have to add the following block to the saml-definition inside your
config.json:
"attribute": {
      "username": "username"
      "email": "email",
}
It you configure CodiMD with enviroment variables, these are the ones you have to set:
CMD_SAML_ATTRIBUTE_USERNAME=username
CMD_SAML_ATTRIBUTE_EMAIL=email